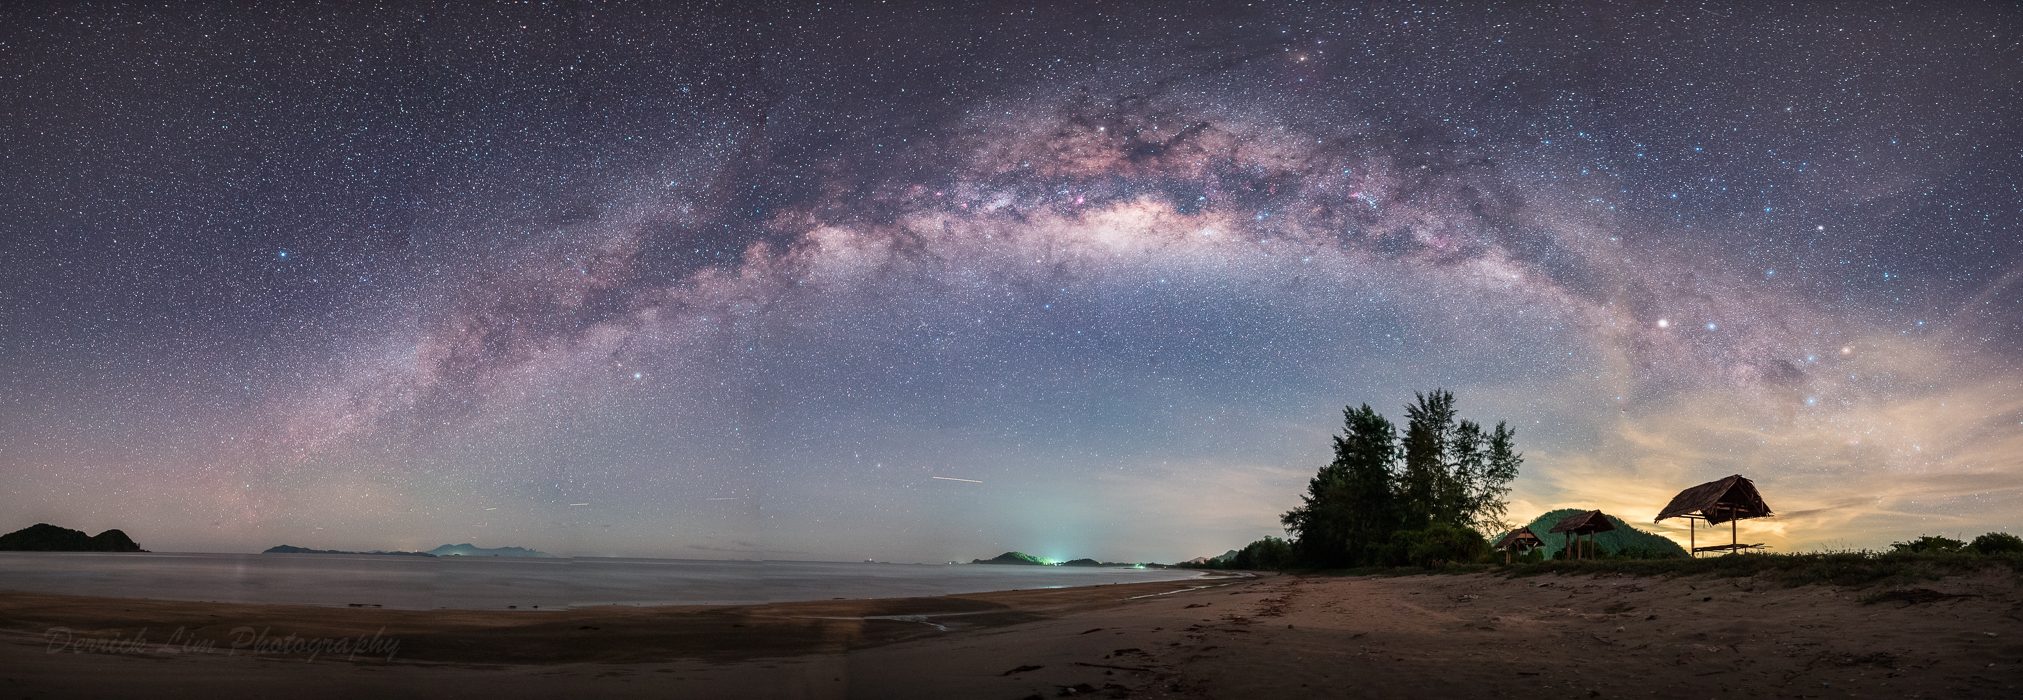
Photographing the Milky Way can be fun and not very difficult. Most people will start by taking photos of the Milky Way’s core (galactic center), which is the largest and brightest part of the Milky Way galaxy as seen from the earth. The galactic core is normally visible in the evening during the months of June, July and August

Anyone can take a photo of the Milky Way with the right preparation and equipment, the following is a step by step guide for taking photos of the Milky Way’s galactic core, hope you will find the steps helpful!
- Preparations: Location and Equipment
- Use a light pollution map to search for dark sky locations (e.g. lightpollutionmap.info, or apps such as Planit Pro, The Photographer’s Ephemeris etc.)
- If possible, visit the site during the day time for a better idea of what to expect at night
- If you’re not familiar with the night sky, it is important to know the cardinal directions to determine where the Milky Way would rise (east), transit (highest point in the sky) and set (west)
- Plan your composition and camera placement to avoid surprises in the dark
- Watch for possible dangers or nuisance, for example tall grass may harbor snakes, mosquitoes, etc
- Understand your equipment, what kind of camera you have? Full-frame/APSC/micro-4/3
- Find the 2-second timer setting, this may come in handy
- Find the multiple shot setting or intervalometer and learn how to use it, this may come in handy
- Important: understand the 500 “rule” which is more like a guideline:
- Take 500 and divide your lens full frame equivalent focal length and don’t round up
- Example, for a full frame 24mm lens, take 500/24 ~ 20s
- Example, for an APSC 18mm lens, the full frame (1.5X crop factor) equivalent is 18X1.5 = 27mm, take 500/27 ~ 18s
- Example, for a micro-4/3 lens (2X crop factor) with 8mm focal length, the full frame equivalent is 8mmX2 = 16mm, take 500/16 ~ 31s
- These exposure values are estimates for the maximum shutter speed you can use to minimize star trailing
- If you’re not comfortable with focusing in the dark, you can prepare by taking note of your lens infinity focus point. Some modern electronic drive lenses don’t have any focus indicators meaning that on site focusing is the only way (For on site focusing, we can use a very bright star/planet for example or a distant light source, utilize Live View and digital zoom to verify critical focus on the stars)
Preparation: Equipment you’ll need
- A camera capable of exposures up to at least 15s, 30s preferred
- Spare camera batteries (optional, just in case)
- A wide-angle camera lens (35mm or wider) that can open up to preferably f4 for full-frame, f2.8 for APSC and f2 for micro-4/3 systems (more on this in a follow up article)
- A sturdy tripod (preferably aluminum or carbon fiber, avoid cheapo plastic tripods)
- An L-bracket (not critical but helps for composition)
- A red flashlight that does not damage your eye’s night sensitivity
- If you have a cable release or remote shutter control, bring it
- A portable chair (optional)
- Some food and beverages to keep yourself powered throughout the trip
- Insect repellant/Sturdy shoes or boots/Warm clothing
- A star chart or star chart app
- A pair of binoculars to observe the stars while waiting for the camera (it’s fun!!)

Heading to the location
- Make sure your car is in good condition with sufficient petrol, an unexpected breakdown in the middle of nowhere can be a nuisance
- Check the weather, satellite weather imagery is always helpful. However do not go overboard with the weather since it can be unpredictable especially if you are living in the tropics. The going philosophy should be: go to the site and give yourself a finite chance, or stay at home and get zero chance! (A good weather website is: http://www.wunderground.com, the Japanese Himawari satellite is also a good reference: http://www.data.jma.go.jp/mscweb/data/himawari/)
- Inform your family/friends of your plans in case of emergency
- You might plan to buy some food and beverages along the way or fill up the car’s petrol tank
Setting up:
- If you arrive to a night sky full of stars, calm down, don’t panic, the stars will be there (they have been for millions of years!) 🙂
- Setup your camera on tripod, make yourself as comfortable as possible
Taking the photo:
- Set your aperture to the maximum (lowest f-stop)
- Set your camera to manual focus
- Focus your camera using a distant light source or a very bright star, it helps to use the digital zoom feature on your camera. If you are using a bright
- Locate the Milky Way, use your red flashlight to estimate your composition and aim your camera (be sure no one else is taking a photo when using your flashlights!)
- You can use a star map app such as SkySafari to help locating the Milky Way, but if you’re at a clear and dark site, the Milky Way should be visible as a faint band of hazy light
- If you’re in the northern hemisphere, the Milky Way’s core is usually towards the south (south-east, south, south-west)
- If you’re in the southern hemisphere, the Milky Way’s core is usually towards the east, overhead, or the west
- Camera settings:
- Set your aperture to the maximum (lowest f-stop)
- Dial in an ISO of at least 1600
- Use the 500 “rule” to estimate your exposure time
- If you have a shutter release cable, use the shutter release cable to start the exposure, being wary that any tugging of the camera by the cable can cause vibrations in the camera that blur the stars images
- If you don’t have a shutter release, set a 2s timer on your camera and then press the shutter button. Note that most cameras have a timer light so be wary of how your light might affect others.
- Once you’ve taken the photo, review it for compositional adjustments, the best images have a subject and a support, so depending on what you would like to convey in your image, you can make the Milky Way’s core be a subject or a support for a subject.
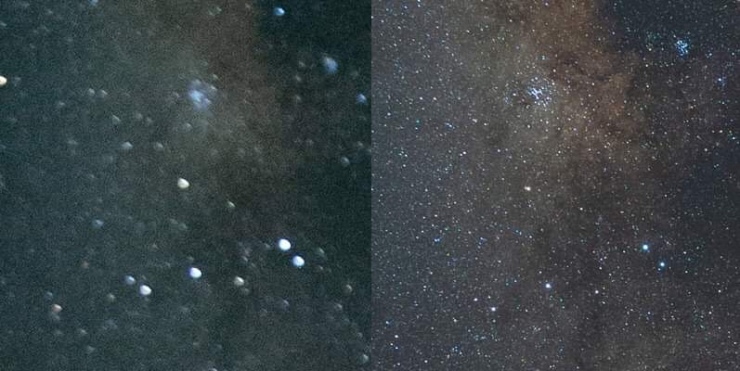
- Some lenses at the maximum f-stop will have star aberrations at the corners of the image (stars don’t appear as points but rather, look like flying seagulls). In this case, you may try stopping down the lens a little by using a slightly larger f-stop to make the corners look nicer. Remember though that by doing this, less star light is coming into the camera and therefore you will have a dimmer image in exchange for sharper corners.
- You can set your camera to take multiple shots (3 or 5 shots is usually enough) with the same settings, this will be helpful in helping to reduce noise in your images (using Starry Landscape Stacker, Sequator or Photoshop, this will be described in an upcoming article)
- While you’re clicking away, don’t forget to take out your binoculars and look around the Milky Way, you may find clusters of stars, nebulae, dark nebulae, all sorts of really beautiful sights amongst the stars! If you really enjoy this, learn the constellations using a starmap app, a planisphere or star chart. Astronomy is a truly rewarding experience!
- Have fun!!! 🙂

